

“…there is a path that must be followed to become a good defensive shooter. The beginning of this path, after mindset, is correct fundamentals. From correct fundamentals we move to concentration, then consistency, then accuracy, and finally speed. The path must be followed in order…Correct fundamentals are the basics of proper shooting.”
~Dave Spaulding in Handgun Combatives
A self-defense mind-set, handgun manipulation skills, and marksmanship are, in our opinion, the most important defensive shooting skills. The next important defensive shooting skills are: moving to create distance, getting to cover, or finding concealment; making sure you are the first person to get a hit on the target because the person who gets the first hit, not the first shot, usually wins the fight; and shooting until the adversary is no longer a threat. If you do not have these skills you need develop and master them if you want to survive a defensive shooting event.
Shooting stance is one element of marksmanship (one of the three most important self-defense skills). Shooting stance is important when you are practicing on a square range shooting at paper or metal targets. Proper stance helps develop and reinforce correct fundamentals.
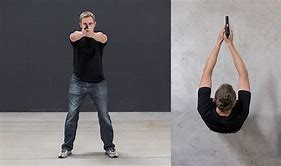
You really need to be in a defensive fundamental shooting stance that allows you to move quickly to cover or concealment if you get caught up in a defensive shooting event. Pat McNamara and others call this “getting off the X” (see link, below, to the blog by this title). If you can quickly identify your adversary as a right-handed shooter, you must move to your left because most shooters are lousy shots and right-handed shooters tend to shoot to their left (which is your right). If the adversary is left-handed then move to your right.
Kevin Michalowski in “Is Your Shooting Stance All That Important?” https://www.usconcealedcarry.com/shooting-stance-important/ observed that “The first rule of a gunfight is to not get shot.” That means if you are involved in a gunfight you need to be moving—making yourself a more difficult target—and heading toward cover. To move quickly you need to be in a stance that will help you do that.
You should be returning fire during this dynamic movement. As you are moving—in a hurry—you probably won’t have good sight alignment or trigger control, but you should be shooting at your target.
Once you get to cover then what matters most is gripping the gun tightly, pointing the gun at the target, and pressing the trigger as fast as you can without moving the gun. This is advice for accurate shooting from Rob Leatham, a professional shooter who is a 24-time USPSA National champion and 7-time International Practical Shooting Confederation World Champion.
It is important to know that whatever stance you adopt you must keep the shooting arm (your strong side arm) locked (except with the Strong-Hand Retention Stance described below). Locking the shooting arm is also not advised for the traditional Weaver Stance, but locking the shooting arm makes it easier to transition to different shooting positions. Dave Spaulding refers to this principle as the “continuous motion principle.”
The continuous motion principle requires shooting techniques to blend into one another. For example, if you use a two-handed shooting stance wouldn’t it make sense to use a locked shooting arm so you could transition smoothly to a one-handed shooting stance? Doing that would create a smooth transition from two-handed to a one-handed shooting technique, or vice versa. The continuous motion principle does not apply to the position of the support arm.
The Top Six Defensive Shooting Fundamental Stances
In the world of firearms there are six popular shooting stances. Chris Christian in an article titled “Top Five Shooting Stances” described what he believes are the top five shooting stances: Weaver Stance, Chapman Stance, Power Isosceles Stance (aka the Combat Fighting Stance), Power Point Stance, and Strong-Hand Retention Stance. He didn’t mention the Isosceles Stance, however, we do. All six are briefly discussed below.
Defensive Shooting Fundamental Isosceles Stance
The Isosceles Stance is a two-handed technique. Feet are aligned with each other, left to right and about shoulder width apart. The dominant hand grips the handgun while the support hand wraps around the dominant hand to create a strong grip (handgun gripping will be discussed in part 2 of this blog series).
The Isosceles Stance requires both arms are held straight with locked elbows. The arms create an isosceles triangle when viewed from above. Unlike the Weaver Stance which uses a push-pull grip on the handgun the Isosceles Stance passively absorbs the recoil of firing the handgun using your skeletal structure.
Pros: The Isosceles Stance is a simple stance and it is easy to get into under stress. It is a comfortable and natural position for many shooters. The positioning of the body facing the target, the extended arms, and the foot placement seem to have a positive effect on accuracy.
Cons: The predominant problem with the Isosceles Stance is that while it has side-to-side stability it lacks front-to-rear balance due to the positioning of the feet aligned with each other left to right.
Defensive Shooting Fundamental Weaver Stance

The Weaver Stance was the first two-hand stance to see widespread use. It was developed by Los Angeles County Deputy Sheriff Jack Weaver for combat-style matches. This stance is an aggressive, “boxer-type” stance.
To assume this stance you place your non-shooting side foot 8 to 10 inches in front with the toes pointing toward the target. The strong-side foot is canted 45 degrees outward.
You use a two-handed grip. The strong-side arm is not fully extended. There is a slight bend in the elbow which is angled slightly outward away from the body. The support arm elbow is bent downward at a 45-degree angle. The support hand pulls the gun toward you while your strong-side hand pushes the gun forward. This muscular tension creates a very rigid grip on the gun.
Pros: The most significant benefit of this stance is the “push-pull” grip because it is an effective technique for controlling recoil and weapon control.
Cons: A major problem with the stance that by blading the body the armpit area is left exposed which creates a direct pathway to your heart. Another problem with the Weaver Stance is that is not easy to move quickly. Additionally, after-action studies of shootings document that the majority of shooters using the Weaver Stance reverted to the Isosceles Stance during the shooting event.
Defensive Shooting Fundamental The Chapman Stance

The Chapman Stance is a modified Weaver Stance. The support-side foot is not placed as far forward as with the traditional Weaver Stance. The support-side shoulder also doesn’t dip and drive forward toward the target.
When in the Chapman stance the strong-side arm is fully extended and locked, which is not the case with the traditional Weaver Stance. The grip used with the Chapman is essentially the same as the push-pull grip used with the Weaver.
Some shooters believe that the fully extended and locked strong arm creates a more stable shooting position as the shooter drops his or her cheek to contact the bicep, which is similar to shooting a rifle.
Pros: Less upper-body strength is needed to maintain the position. Some shooters with cross-dominant vision are able to get their sights aligned and on target quicker. Another major benefit of the Chapman Stance is that you are able to exercise effective recoil.
Cons: The Chapman Stance is slower to assume than the Weaver.
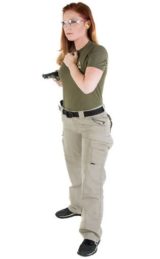
Defensive Shooting Fundamental Power Isosceles Stance (aka, the Combat Fighting Stance)

The Fighting Stance was developed by members of the Special Forces community. It is also commonly used in the law enforcement community. It’s also a great technique for civilian shooters. Spartan Firearms Training Group teaches this stance to our students.
In the Fighting Stance, you are square to the target. Your feet are shoulder width apart with the strong side foot slightly behind the support side foot. The foot placement (strong side foot slightly to the rear, shoulder-width apart) eliminates the forward-rear balance issue that some shooters experience with the Isosceles Stance.
Your body weight is slightly on the toes thereby shifting your center of gravity slightly forward. This creates an athletic stance that makes it possible for you to move quickly in response to an attack.
Your knees are also slightly bent to absorb recoil and to help you to move quickly. You lean slightly forward and extend your arms straight out as with the Isosceles Stance. The sights are brought to the eyes to achieve sight alignment and an acceptable sight picture. Your head is kept level to maintain balance, especially when moving.
Pros: Any weapon can be fired effectively from this stance. Other self-defense weapons can also be used effectively from this stance. Those with martial arts experience may also find this position helpful should they lose their firearm and have to engage in hand-to-hand combat.
Cons: There really isn’t a downside to this stance.
Defensive Shooting Fundamental Power Point Stance

The Power Pont Stance dates to when dueling was common. The basic idea with this stance is to present the least amount of body surface to the attacker. This happens as you face the attacker sideways. This stance also frees up the support hand to use a flashlight or turn a door knob.
The one handed stance was taught in the U.S. military. Problems arose as soldiers found it difficult to manage the recoil of the Army issue Colt M1911 pistol. Accuracy suffered when recoil was not managed. Given the recoil management issues, the military now teaches the two-handed shooting stance.
Defensive Shooting Fundamental Strong-Hand Retention Stance
There are self-defense situations where you are so close to an attacker that you risk having your firearm taken away. This “danger close” situation happens when an assailant quickly closes the distance between him and you (see the 21 foot rule https://www.usconcealedcarry.com/revisiting-the-21-foot-rule/)
Being unexpectedly disarmed can also happen if you decide to go room to room in your house, peeking around corners, in response to unusual noises (Spartan Firearms Training Group’s instructors strongly advise students not to “investigate” a strange noise, rather they should stay put in their bedrooms with the firearm ready to use).
However, if you are faced with a “danger close” situation or if you are surprised by an assailant in your house or place of business the Strong-Hand Retention stance can be an effective response.
To achieve this stance you tightly tuck your gun-arm into the side of your body with your elbow at a sharp 45 degree angle. The gun is just a few inches ahead of the abdomen and pointed straight forward.
In one variation of this stance, the support hand delivers a lightning fast and hard strike to the assailant’s chin or nose. The striking hand in the form of a closed fist is then quickly withdrawn to the center of the chest. In other variations of this stance, there is no strike to the assailant’s head but the support hand is still formed into a fist and placed in the high-center of the chest.
Pros: Foot placement doesn’t matter with this stance. If threats appear close and suddenly, all you have to do is pivot your upper body to bring the gun to bear and fire. If threats appear at farther distances you can shift quickly into another shooting stance.
Cons: When shooting from a “danger-close” stance the concussive force of the gun can impact the shooter. It doesn’t hurt and it’s usually not dangerous, but for untrained shooters the concussive force is a surprise that can disrupt his or her attention.
Also, if your gun has a compensator or ported barrel gases and gunshot residue could be blown into your face and eyes. This effect can take you by surprise and in some cases it can temporarily disable your vision. If you have a handgun with a compensator or ported barrel then your gun should be extended farther from the body.
Conclusion
Defensive hand-gunning is about fighting with a handgun. To fight effectively with a handgun people need to master one attitude and two sets of skills: mind-set (mentally prepared to shoot), handgun manipulation (knowing how to use a handgun, load it, clear malfunctions, and so on), and marksmanship (shooting quickly and accurately).
One aspect of marksmanship is shooting stance. It is important to learn and practice a stable, balanced, and mobile shooting stance. The stance needs to be stable and balanced to protect you from losing your balance when you experience the gun’s recoil. Your shooting stance needs to be mobile so you can move quickly to cover or concealment. Your stance must allow you to transition smoothly from one technique to another (Dave Spaulding’s continuous motion principle, discussed above).
Although no one stance is perfect for all situations the Spartan Firearms Training Group instructors believe that the Power Isosceles (aka, Combat Fighting Stance) is the most adaptable for most self-defense situations. The adaptability of the Power Isosceles stance is an example of Spaulding’s “continuous motion principle” that requires shooting techniques to transition smoothly to other techniques. We believe that if you are in the Power Isosceles stance that you can smoothly transition to other stances and shooting techniques.
On the live-fire range, Spartan Firearms Training Group instructors often have to correct the shooting stance of our students. Many new shooters initially stand with a backward lean. Some stand with a rigid stance. Others take an excessively relaxed stance. None of these stances are aggressive fighting stances. In our opinion, there is only one effective fighting stance: the Power Isosceles Stance.

Whatever stance you adopt as “yours” you must practice getting into that stance until you can do it without thinking. Every time you go to the range use your preferred stance. When you are dry practicing at home (with an unloaded handgun, please), use your preferred stance.
In a life and death situation you do not have time to think about what you need to do. You have to react without thinking. You develop this ability by training. Remember, when the time to defend yourself or a loved one arrives the time to train has passed.
In the next post, Defensive Shooting Fundamentals – Part 2: Grip and Breath, we discuss the importance of gripping your handgun properly and the impact of breathing on shooting accuracy.